Wednesday, January 20, 2016

Dressing Downton

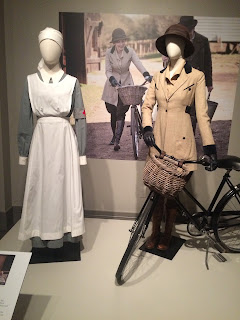
So a few months back we saw that the clothes from Downton Abbey were making a visit through Richmond and would be on display at the Virginia Historical Society.  Well, of course, being such fans of the show, a few of us wanted to check it out but with holidays and schedules, it was not until the last week or so that we were able to make it out there.  It was just as awesome as I would have hoped though and it was fun to get to see the clothes up close and learn a little about them.


Of course we had to start off with a group shot, its (fron left to right): me, Lila, CJ and Kristi.


A few of the outfits of Lord and Lady Grantham and the Dowager Countess of Grantham:

The servant bells:

Riding outfit


Servant Outfits:


This is Mary and Anna's outfits, side by side


Lady Sybil as a nurse


A very Pregnant Lady Sybil's outfit:

All in all, it was a fun day with fun friends and we even had time to grab a yummy brunch/lunch afterward.

Tuesday, January 12, 2016

Button Earring Tutorial

So I have seen button earrings for a while now and have wanted to try my hand at making them for a year or more now.  I tried a few months ago, but used small buttons and apparently that is much harder to accomplish!  So, I tried it again about a month ago, this time using bigger buttons, which made bigger earrings but still not super huge.  So I took pictures to document in case anyone wanted to try it out too!  These were great to hand out to friends and family as handmade Christmas gifts this year. I always like trying to make something fun and useful if  I can!

1. First things first, pick your fabric.  If you think ahead, buy your button cover kit first and then you have a template to take with you.  I was not that smart, but I was able to wing it and it worked out just fine anyway!  WIN!

2. Using the template cut out a circle on the outer layer, making sure what is visible in the inner circle will be what is gonna be your earring.

3. Remove template and viola you have a circle, now repeat cause you need two for a pair of earrings!

4. Then using the button kit, you will want to turn your fabric upside down and lay it over the mold.

5. Then set the button on top of the fabric and push into the mold...

6. Like so:

7. Fold in the edges of the fabric to gather in the center of the button.

8. Then line the back on top of the folded over fabric.

9. Using the blue plunger and a little bit of strength, push the back onto the button until it snaps in place.  This took me a few tries and a lot of force, my fingers would get tired after like 5 pairs, so I needed frequent breaks!

10. Viola you now have a button.  But we want earrings and NOT buttons, so there is still more steps, which I unfortunately did not document!  But using pliers you want to remove the button hole portion on the back and then super glue an earring post onto the back.  Allow to dry overnight and you have a pair of earrings.

11. Repeat multiple times and you have 4 pair of earrings.  Check out the various patterns that this works for!

12. Send off to friends and family right before Virginia Tech plays in the Independence Bowl and assume they were able to get the win because all your friends were wearing their new VT earrings!  Or maybe it was that wicked sweet Coach Beamer that lead his team to victory, we may never know...

Monday, January 11, 2016

Easy Garlic Chicken

The title does not lie, this really is EASY garlic chicken, though I think it really should be called Easy Garlic and Brown Sugar Chicken, but I digress!  This has been a family favorite for years, so I am not sure why I am just getting around to finally taking pictures and sharing the recipe, but I doubt you will be disappointed when you give it a try.  And honestly if you have ever been to my house for dinner you have likely had this recipe so you can attest to its deliciousness. 

You will want to start with garlic, a lot of garlic.  Think about like a whole bulb almost, I told you it was a lot!  

First things first, peel off the cloves...


Then peal the cloves so the "skin" is not left on them.

 Next, use your handy dandy, Garlic Rocker.  What's that?  You don't have one, well then go here and buy one now, seriously, its so great for chopping lots of garlic.  Want to know what I mean, check out these pictures:

One garlic clove chopped in seconds:

Once you have all the Garlic chopped, put it in a small frying pan.

Then assemble the chicken on an aluminum foil covered cooking sheet (you will thank me later when you don't have to scrub that pan cleaned).  Salt and pepper the chicken to taste, aka lightly season it.

Next mix in the Olive Oil in with the chopped garlic and turn heat on.

While the garlic is starting to cook, measure out the brown sugar in a prep bowl, like so:

You want the garlic to infuse with the oil, but not to overcook, so keep a close eye on it.....
 Looks about right:


Next, pull the garlic and oil mixture off the heat and dump in the brown sugar:

Combine both until it is thoroughly mixed and you have something that looks like this:


Now divide up the brown sugar mixture evenly onto the chicken pieces:

Then spread out to cover the chicken and pop in the oven.

About 15-20 minutes later you will have delicious, juicy chicken:  (Note: do not overcook your chicken, seriously don't do it, get a meat thermometer so you can pull that mess out as soon as it hits 165 degrees)

Serve alongside your favorite side dish, this night it was roasted potatoes with a side salad.  Note, I spoon a little of the juice onto the chicken when serving:

Now for the recipe:

Ingredients:
* 4 boneless skinless chicken breasted (cut horizonately down the middle to create 8 pieces)
* 8-10 garlic cloves, minced
* 8 tablespoons brown sugar
* 2 tablespoons olive oil
* Salt and Pepper to taste

Directions: 


  1. 1. Preheat oven to 450°F Line a baking dish or cookie sheet with aluminum foil and lightly coat with cooking spray or lightly brush with oil.
  1. 2. In small sauté pan, sauté garlic with the oil until tender.
  1. 3. Remove from heat and stir in brown sugar. 
  1. 4. Season chicken with salt and pepper. .Place breasts in a prepared baking dish and cover with the garlic and brown sugar mixture.
  1. 5. Bake uncovered for 15-30 minutes, or until juices run clear. Cooking time will depend on the size and thickness of your chicken, use a meat thermometer til internal temperature reaches 165 degrees.